Welcome to the Studio

Welcome to BJC Mini Studio's blogsphere. Check out my new or past painting projects. Take a look at my battle reports for Warhammer 40K, Army Lists, and various Games Workshop goodness...and badness.
Showing posts with label Painting. Show all posts

Friday, October 26, 2012

Captain for the "Siah Marines"

Hey folks got another post.

Will all the attention I've been giving my Orks, my son lovingly reminded me I had promised to paint his Space Marine captain over a year ago and it's been sitting in his box with his other marines primed and based coated in Army Painter Green.

And of course when I say "lovingly" I mean...Well you know.

So I took a break and did a BTT (Beyond Table Top) paint up of the Captain of the 4th company of the Siah Marines (my son's name is Josiah - hence Siah Marines).

I give you Brother Captain Jack Russel (he loves Wishbone)


Paint job was kept simple enough that when he does his dry-brushing technique for the rest of the army it will match for the most part.  I decided not to highlight the black and just let it contrast the rest of the highlighted parts of the model.

-BJ

Monday, October 22, 2012

Finished - Ice Despot Klawgrot

Well the painting is done.  Only thing left is some snow effects on the base.

Enjoy...


-BJ

Saturday, October 20, 2012

Frozn' Tundra Orks Update

Some more updates on the Orks.

Skin done on the WB and the Biker Nob.

Here's the formula I worked with.

Base Coat - 2:1 Hawk Tourquise and Orkhide Shade
                 - Add Hawk Tourquise to mix
                 - Add Ice Blue to the mix
                 - Add Skull White to the mix
                 - Add more Skull White to the mix
                 - Separate a small portion of mix (couple of tank brush loads) then add equal amount of Skull
                   White for final highlight.
                 - Thrakka Green wash to blend everything in and add a bit more green tint to the skin

"Uniform" is done as well.  I kept this pretty simple so I can reproduce on the 100+ models I have to paint up.

Base Coat - Codex Gray
                 - Shadow Gray shapes
                 - Space Wolves Gray shapes
                 - Black Ink/Flesh Wash (4:1) + 3 parts water wash (I use the same mixture on boltgun metal)

WIP Shots


More later,

-BJ

Friday, October 19, 2012

Ork Warboss - Ice Despot Klawgrot - Ov Da Frozn' Tundra Orks

Oi!  All yuz humies com chek diz out!

Began work on the Warboss for my Frozn' Tundra Ork Clan (yeah don't like to stay completely by the book as ya'll know).

Skin tone will be more ice blue/green, and maybe a snow/urban camo scheme for the pants.  Not sure on that yet.

Everything will be based on Dragon Forge Urban Rubble bases (Great work as always Jeff!) with my snow recipe added to create the cold effect.

Base for the WB is done for the most part.  I've got to add a frozen muck coming out of the pipe and then the snow, but that's after I get the WB finished and on it.

Here's some WIP shots.  More to come as I add them.  I'll also give the colors used on the skin tone once I finalize them.  I based him with a 2:1 mixture of Hawk Turquoise and Foundation Orkhide Shade.  Gives a really nice deep sea green color to build the "blue" up from.  Obviously I'm going to pull the WB from the cork base and pin to the perty base.


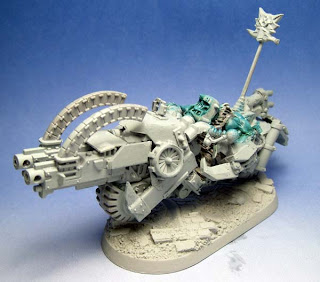
Also here's a quick WIP shot of the Warbiker Nob conversion.  


-BJ


Saturday, February 25, 2012

RC Helicopter Distraction

Okay so my son's birthday came and went (thankfully I was actually not traveling for work for a change) and he got his first RC helicopter.  Then Dad loved it and had to go out and buy one...

and paint it because I hated the paint job. So here's my Air Hogs Havoc in flight with a simple repaint.


Sooo, what happened next?  I bought a couple 3.5 channels and a 4 channel to play with and my son said "Daddy, you know what would be REALLY TOTALLY AWESOME?" and Dad says "What buddy?"

"If you painted your new helicopter as the American Flag!"

Okay, hey I'm patriotic.  I'm a veteran.  I thought...Oooooooo

Sooooooooo

Here's the King Cobra G2 3.5 channel BEFORE my brushes hit it...


And  then with a little Red, White, and Blue added to it...


Not what I could consider my best work, but I tried to squeeze this in over a weekend in between working on another project.

Flight video post paint job


So then we get the new birds in (okay maybe went a little heli happy) and he says, "Oooooo what about a dragon!?!"  He's killin me, he's really killin me.

Well I'm really busy with trying to get another project done right now, but I'll work out a design for the Syma S032 (funny its called the fire dragon) to turn it into a Red Dragon.  But I'm going to take it slow on it since I really need to get this Infinity Combined Army project finished up (pics on that later).

The other birds in the project list are a JXD 340 Drift King 4-Channel and a Double Horse 9103 Fixed Pitch 3.5-Channel.  Have no idea on what I'm going to do to them though.  Suggestions anyone?

Well more as I work on these of course.

Saturday, October 9, 2010

PROJECT - Terrain - Hexagon Construction Set Part III

Alright I'm closing up the project on the Pegasus Hobbies Hexagon Construction Set.  As I've said this has been a really cool kit to work with, and over all I'm really  pleased with how the project has turned out.  Remember folks this was the "small" kit and it's a pretty big terrain piece.  I'm definitely going to get my hands on the "large" kit.

I also did a couple of quick pieces with some "egg" crate packing foam I picked up at work so I thought I'd throw them in today's post as well.  Nothing like recycling CD's and CD/DVD spool protectors for some simple war-gaming terrain.

So without further adieu how about some pics huh?


And FINALLY!


Plans are to add some resin "mud" to the hexagon piece as while my base coat for the ground was drying it looked pretty cool as mud.  So I've still got to paint the border black, seal it with matte, then add the resin "puddles".

More pics coming once I'm finally complete!

Friday, October 8, 2010

PROJECT: Terrain - Hexagon Construction Set - Part II

Well moving along with the Hexagon Construction Set.  Not much done other than finishing off adding texture to the base and then getting the thing primed.  Let me tell you this was a major pain to prime.  I ran out of Krylon Charcoal Gray while trying to spray this beast and knew I wasn't going to hit Wal-Mart anytime soon and wanted to get this piece further along so I can go back to finishing up some commission work that is getting close to the deadline.  Yes Brian and Bill I WILL be done soon.  ;-)


So to recap.

  1. The base for the kit is a piece of laminate flooring I used my jigsaw on to create a nice shape.
  2. The kit was assembled (it's a snap-to-fit kit) without superglue at first.
  3. Kit was mounted to the base about halfway through full construction at which point I started to apply superglue (brush out Krazy-Glue ROCKS!) to the joints for stability and strength, then construction was completed.
  4. Basing material added along with some sculpy rock formations I pulled from another project I scrapped.
  5. Primed using Krylon Charcoal Gray and when I ran out, brush on mixture of black craft paint and the dark gray GW Foundation Charadon Granite paint...mental note, need to buy more of this now.
  6. It's ready for paint!
So here we go...


I may go back and add some GW bits (eagles, seals, tabbards or perhaps some orky stuff) to make it more 40kish, but for the most part I'm happy.  The little pyramid in the top corner may get a gun turret added just for fun, but I'm not sure on that yet.
More once it's got paint on it!

Anyone else use these kits before?  Send me some shots of what you did with it so I can post it up and see what you did different.

-BJC
   

Tuesday, September 28, 2010

Project - Terrain

So I thought I'd spend some time talking about terrain today.  I'm REALLY not good at making terrain.  I've made more than a couple of attempts to make my own game board for the house only to have something go wrong with it and end up trashing a lot of wasted materials.  Really nice terrain or a really nice game board are while not essential to our hobby certainly important to the look and feel.

When the kids and I break out our 1" warriors we typically use pots, pans, the water cups we're drinking from during our gaming time as terrain.  This was getting pretty boring for us and that led me to look a little closer at getting some decent terrain for our Thursday night Dad vs. Kids sessions.  Why?  Well for starters, it's difficult to play some scenarios without terrain.  When looking for example at some of the Kill Zone scenarios you need to fill your game zone with typically 25-50% terrain.  Lets face it, you can only do so much with a couple of pots, a sugar container, and some water cups.

So back to getting creative...

Below are some pieces that I threw together, you see it finally dawned on me that I don't have to have a slick looking game "board" but I needed some decent looking terrain pieces to use on my 4x8 dining room table.  Our table is WAY  more than big enough for any number of sized games so what was truly missing is just some decent terrain pieces, pieces that are fairly simple to create with all of the totally awesome tutorials out there.  Not to mention, there are some great companies making terrain pieces out there that can easily be modified or added to to create some great pieces for your board.  So the next few posts will be on terrain.

Here are a couple of pieces I've put together.
 
First up is a ruined building.  It's basically some plasti-card cut into the two walls.  Now it's not cut as jaggedly as I would have liked, but it works for what I was looking for.  Then I just scattered some cork board around and created the concrete rubble.  The blast crater is a resin piece that I can't remember where I ordered from, but it came in a set of 5 so needless to say those will become additions.  Everything is mounted on a laminate floor tile I had left over from re-doing my floors so I cut up a piece into the basic shape I wanted and there you go.

Coloring is pretty straight forward, primed in gray then just worked the colors the way I wanted and for the most part I'm pretty happy with how this piece turned out.  Need to figure out adding more texture to the walls themselves, but there plenty of ideas sitting out on the net concerning adding the rough texture to the walls.  I may try the mixing sand with watered down PVA glue next time or maybe some textured paint.

The next piece is an objective marker I made.  It's based on one of the clear protectors that come at the bottom of a CD/DVD spindle.  From there I think I threw on some broken bases, plasti-card, and cork board pieces.  PVA glue and sand.  The "objective" part of the piece is a shrine made from some Space Marine bits and a cross that came from an old Reaper mini that never got painted.  Added in a teleport homer as well lets face it the piece works for any deepstrike scenario as well.  Nothing like making a piece multifunctional. 

Look for a new article coming up on reviewing some terrain pieces from a Pegasus Hobbies!

-BJC

Monday, September 27, 2010

Project - Vanguard Champion

Thought I'd throw up a couple of shots of a Vanguard Champion I'm working on for my personal collection.

It's a slightly converted 2008 Games Day Captain mini I won as a prize for the Bartertown Sci-Fi painting competition.

Components:
  1. 2008 GD mini
  2. Dragonforge 40mm Hero base from the Lost Empires series.
  3. Pre-Heresy Jump Pack from Chapterhouse Studios
  4. Pre-Heresy Masked Helmet from Chapterhouse Studios
Painted up in my Flame Guardians color scheme.  Not 100% finished still have some minor details to work on:  Black needs highlighted, another Sunburst Yellow then Skull White layer on the Yellow particularly the Helmet and then the NMM (Non-Metallic Metal) on the shoulder pauldrons, then the wreath and jewel on the Right Leg needs finished.  I like Gold NMM I don't like Grey/Silver NMM much at all so I tend to combine the Gold NMM and Silver Metallics techniques because...I can.  ;-)


As always, thanks for looking.  Check back for the finished model in a couple of days.  I'll do a full write up on the coloring and the Yellow NMM though without pics on the next post.

-BJC

Tutorial: Dragonforge Studios Hero Base

Okay as promised, here's a mini-tutorial on how I did the resin hero base from Dragonforge Studios.

So I ended up winning the Bartertown Sci-Fi Painting Competition and as compensation for placing first I won some cashola along with being able to choose a prize pack consisting of three items from a group of Bartertown advertisers.  One of those pics was a credit with Dragonforge Studios.  So I picked up some resin bases from Jeff and of course while shopping on his site ordered myself some additional goodies.

One of those was the Hero Base set from his Lost Empires range.  Absolutely love these sculpts, and price wise they beat anything being produced anywhere else.  Don't get me wrong, I'm still a major fan of the Micro Art Studio bases, but Jeff has got my attention, favor, AND business with his bases.  See Jeff there's some more product pushing for you!  I highly recommend his products (more shameless advertising...) ;-)

So here's a Dragonforge shot of the base I'm working with done in his paint scheme.  I'm working with the larger 40mm base on the left for this tutorial.  For the most part I really liked the scheme that the studio used so I'm going to replicate it to a point.

I've got the model that is going to sit on this beast of a base as well. I picked up in my prize package the 2008 Games Day Space Marine Captain and the combination of the running pose with that big honkin' thunder hammer just screamed Vanguard conversion.  So obviously I must answer the inner call to convert a model.  Nice thing about that mini is the arms, and head are separate pieces so I can easily swap out the head for a nice Pre-Heresy Masked head from Chapterhouse Studios...SCORE!!!

Totorial Time!

Prep - Wash the model in cool soapy water and let dry overnight.  I use a brush-on priming technique for display quality models so I used Foundation Astronomicon Grey to prime the base, again let dry overnight then hit it again and then let that dry a couple of hours.  Ready to go!


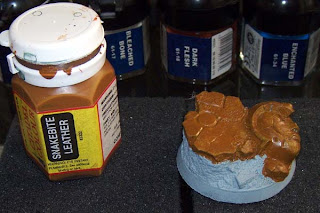
First shot - Snakebite Leather used to base coat the tile surface and the statue face.  Make sure you get all the cracks and crevices. I used this straight from the bottle, no thinning down. I did only a single coat on this as I wanted some fading on the base coat for effect.
 

Second shot - I know odd that I'm using a Foundation as a secondary color instead of a base coat huh?  Well I never said I do things "normal".  Dry-brush of Tallarn Flesh - again straight from the bottle 2 layers of dry-brushing.


Third shot - Fairly heavy dry-brush of Bleached Bone (3-layers) again straight from the pot (NOTE - most of my dry-brushing is straight from the pot unless I'm going a "wet" brush technique at which point I think 1:1 with water).


Fourth shot - Light dry-brush with Skull White (1-layer) just over the edges to accentuate the lines.


Fifth shot - Dark Flesh straight from the pot, carefully hit the cracks between the tile and the statue head.  I did have to water this down a bit as this series of paint from GW was unusually thick.


Sixth shot - Seem to have lost some pics that or I fogot to shoot the progression stages for the Dark Flesh, however this is where i stared dry-brushing over the Dark Flesh and blended in some of the texture colors over the tiles and statue head.  In otherwords, once the Dark Flesh was fully dry from the first coat I took and wet-blended the stages of Bleached Bone and Skull White by taking a detail brush and adding a line of Dark Flesh along the borders of the Dark Flesh and the tile and statue head BEFORE beginning the dry-brushing of the lighter colors.  This created a nice effect along the borders.

So I forgot to take any pics of the progression of the final dry-brushing layers.  If you see in the "Sixth shot" the Enchanted Blue and the Vallejo Model Color (70857) Golden Olive.  The dry-brushing here was more a blotting technique to add some faded marbling to the stone.  I also used the Enchanted Blue in the circle on the tile floor.  Finally the Eyes were filled in with Black then highlighted to look like Opals and the jewel on the forehead of the face was done in a red jewel technique then a light dry-brushing of Bleached Bone was done over the jewel and eyes to depict dust covering.  Black border and a few coats of Matte and VIOLA!


Check back on the site to see what happened when I mounted the Vanguard Conversion!

-BJC

Thursday, September 9, 2010

Project - Deathwatch Rhino

So in continuing my work on Bartertown Admin porkuslime's "Deathwatch" project, he requested me to paint up a squad of Sniper Scouts and a Rhino for one of his Sternguard squads.  Haven't finished the scouts yet but I've put most of the final touches on the Rhino and thought I'd show it off.

Jim (porkuslime) had some custom doors and front made for this guy.  "Pyriel-" from dakka did them up for him and he did a fantastic job.  May have to order a few myself in the future.  Fun to paint, simple yet elegant.  In the original models I painted for him, he requested no mud/grime or wear and tear, or battle damage so I took that queue and did the same thing for the rhino.  Very simple paint job, with minimal colors.  Jim's an OSU fan so the color scheme (I hope) meets his desired affect.  To quote:


"wow.. and drool.. " - Jim (porkuslime)


Let me know what you all think!

-BJC

Friday, September 3, 2010

Review - Horus Heresy Era Bits

There's something about making that perfect unit for your army that leads us all to go out and try to come up with something unique and interesting to model and convert.  That ignition in our souls so to speak that sparks the flame of creativity to so something different, something no one has seen before (or at least no one in our immediate gaming community).

So where does that creatively driven gamer go to quench that need?  Well if your Google-Fu is strong enough, there's quite a few places really.  So I had that bug hit me, and of course I'm first a modeler/painter so obviously if I'm building something unique for myself I'm going all out!  My Flame Guardians project is somewhat built around those type of unique units.  Probably the key unit in that army (you'd think it would be the Kantor HQ right...) is my Uber-Vanguard unit.  The fully decked out PW, PF, and TH heavy Fast Attack unit needed something more than the metal GW models, or a bunch of plastic Assault Marines all armed with power weapon goodness.  I wanted these guys to stand out, yes that usually means that the pretty unit will be the first unit that my opponent will focus on, but that can be a good thing.

***insert hypnotic voice here*** Focus on the pretty, pretty, shiny NMM goodness and conversions while my two units of Sternguard Vets and Kantor take and hold your objectives and destroy your tanks... ***end hypnotic voice***

What to do, what to do....

Heresy Era Bits Conversions!!!  YESSSSSSS!!!!!

There are a few options out there, and I'm going to focus on two sites and their bits specifically.  For my Uber-Vanguard unit I decided I wanted to portray a unity that represented a very specialized group of Space Marine Heros.  Sure the 1st Company gets the Terminator Armor, but what about those who are considered the creme-de-la-creme of the Assault Marines...So were born the Flame Guardians Honored Ones!

I've always like Assault squads, and of course one can run Shrike and get some cool Infiltrate goodness with an assault unit.  Nothing like having Shrike and a 10-man assault squad just "pop" up behind enemy lines. Ahhh, Good Times!  But I digress.

So I wanted my Honored Ones to have a pre-Heresy or Heresy look and feel to their armor.  I didn't want to do a lot of sculpting (cause I suck at it) and I knew that there were some great conversion bits out there.  When you combine those with regular Assault Marines bits or BA Death Company Legs you can achieve some pretty slick looking Vanguard Vetrans.

The options I considered were from Chapterhouse Studios and MaxMini.  Both have their strong points, and weak points.  Personally I do wish I would have gone a bit of a different route than the one I did, and I may consider doing up a few additional models with a few different bits to add some additional options to the unit.

First up the bits options from MaxMini:

I love the look of the Heresy Era Turbine Jet packs.  They just plain look better than the GW plastic JP's and though the metal ones that come with the Vanguard Models or the Chappy look good with the chains and such, I just haven't liked the casts I've gotten in the past.  Now the ones from MaxMini are nice but there's just something about them that kept throwing me off.  Probably the flaps around the air input part of the turbine.  You be the judge...

The detail on the packs is great though, but like I said there's just something about the packs that kept trowing me off.  Cost wise they are pretty reasonable considering you'll be ordering them from the UK.  For 5 Jump Packs you'll be out 5.65 Euros or $7.25 plus shipping of 3.00 Euros or $3.85.  So $11.10 for 5 Heresy Era Jump Packs.  Actually not all that bad.  Of course I am running a squad of 10 Vanguard Vets, so I would have to tack on an additional $7.25 for the additional 5 packs.  So $18.35 for 10.  Again, not all that bad for what you get.  Now I did not order these.

I'm a big fan of the Black Templar MK2 Helmet, but again for my Honored Ones I wanted something unique and different for the look and feel of the unit.  MaxMini also offers what they call their Steam Knight heads.  These are simply AWESOME in their Heresy Ere goodness.  Dang shame I didn't go with these, and I truly wish I would have.  I love the detail in these helmets, and they are really perfect for the look/feel of the unit.  Again, I didn't go with these, and wish I would have. Cost for the Steam Knights is again the same as the Jump Packs.  Comes to $7.25 for the 5 heads.  My personal favs are 1 and 4.  Really don't like number 3 in the picture.

Now onto the ones I did go with.  Not that I regret what I went with, I just wish I'd have seen the Maxmini Steam Knights FIRST.  Then of course I would have had to pay shipping from two locations though.

Next up is Chapterhouse Studios' Horus Heresy Era bits.

I personally like the Turbine Jump Packs from Chapterhouse better than the MaxMini ones.  They just had the look I wanted and didn't have that silly flap on the input part of the turbine.  These do have the vent flap, but at a more logical location at the bottom of the turbine, though I did choose to leave these off of my final models.  I also prefer the fact that in comparison to the Maxmini JPs the turbines point inward and not out.  From the perspective of jet flight, the outward pointing turbines from Maxmini just don't look right.  Again, that's personal preference.

Now these bits ARE more expensive than the Maxmini Jump Packs.  At $10.00 for five and $5.00 for shipping they come out to costing a bit more ($25.00 for 10 with shipping) than the Maxmini Jump Packs.  Again, you get what you pay for and I'm MORE than satisfied with the Chapterhouse Studios' bits.

So what about Heresy Era heads you say?  Well Chapterhouse has two options for the heads, and to be honest, while I like them, I still wish I'd have gone with the Maxmini Steam Knights.  The options are Spikey or Masked.  Both are very detailed, but only come in a set of 4 vs. the 5 Steam Knights from Maxmini.  Again, not a big deal, though at the same time kind of falls into the "doesn't make sense" due to the fact that at the very minimum one needs 5 heads to make a Combat Squad and I needed 10 heads to make my Vanguard.  Not a huge issue since I used a Sergeant Chronus head for my Champion meaning I only needed 9, so a quick conversion to a Beaky Head got me to my 8.

I really didn't like the Spikey headed bits.  They would make a great Chaos conversion, especially for those building an army that had just fallen to chaos, or was perhaps in the process of falling and you had those marines who were beginning to adorn their armor with additional "trinkets" but for the look of my Honored ones they didn't do it for me.  I did think of getting them though and just filing off the spikes because I like the overall look/feel of the bits.

I chose to use their Masked heads.  I like the look/feel of them and I think they work great as Assault Marine heads as the rebreathers just look darn cool.  Again, the problem being was that they only come 4 in a set instead of 5.  I contacted Nick on this logic, and was told that at the time the sculptor did only a set of 4 instead of 5.  Per Nick: "Mainly because at that time the sculptor decided to do a set of 4,  pretty much I have set that number to 5 now :)".  This is the set I chose to go with and I'm for the most part happy with that decision.

Cost for the  heads is $3.75 for a set of 4 heads.  Shipping is still $5.00 so with 2 sets (what I ordered) that came to $12.50 for 8 heads.  Comparatively speaking this is cheaper than going with the Maxmini heads as even if one was to order 3 sets, the shipping would still be only $5.00 (still high for padded envelops) leaving the total for 12 heads at $16.25 vs. $18.35 for 10 heads from Maxmini.

I don't have one of the Vanguard finished that has the Heresy Head, but here is the Uber-Vanguard Champion (SGT) done up in all his nicey, niceness.  As i said before I decided not to use the vent flaps on the jump packs. Not that they necessarily looked bad, I just didn't like them. They come as a metal add-on and work great as mixing bits in your paint pots though.  ;-)

There are other sites out there for these type of bits.  Lots of business are getting into the resin conversion bits business and as I said, if your Google-Fu is strong enough you're sure to find what you're looking for.  I do recommend Chapterhouse Studios and Maxmini though.  Awesome products and again, yes you're going to pay for them, you're going to pay more than if you just go with what GW has, but you get what you pay for and if you want character, uniqueness, and something different then you've got to go out there and do it.

So have some fun with your army.  It's not always about building that perfect list, that unbeatable army.  It's about having FUN, it's about flexing the proverbial brush muscles and building/converting/painting the army that you're going to enjoy.

Let me know what you've done to make your army unique to your taste!

-BJC