Okay so it has been a while since I posted anything, but life (especially work) literally cut my hobby time down to nil.
So new Project - Warmachine,
WHAT? DID BJ FALL OFF THE WAGON AND STOP DRINKING THE GW KOOLAID?????
No me and my Space Marines are very happy together and I love painting and playing them. I've always loved the Privateer Press model lines and the background story for the Iron Kingdoms world is pretty cool. My problem with them is that some of their earlier metal models were just so hard to put together and get to pin properly.
But their plastics are just awesome, the sculpts are clean and are just fun. So I hopped on my favorite trading site (bartertown) and picked myself up some Protectorate of Menoth models and then headed over to my FLGS and added a box set to give me some stuff to play around with.
Now you all know me (well some of you do) and I have never been one of those guys who likes to follow standard color schemes. This is probably my biggest complaint about the Warmachine universe is that the color schemes are so static that whenever someone tries to do something different it just "feels wrong." While while I really like the holy crusader idea of the Protectorate (love Black Templars after all - hate the color scheme) I absolutes abhor painting white, and though I love painting blues and reds I don't want this force to be confused with a Khador or Cygnar (also like) force.
I'm leaning towards a Black/Blue scheme, but I'm not sure on that. I need to think on a robe color that can go with it.
So look for some new pics and progress shots soon!
-BJ
Thursday, May 26, 2011

Saturday, October 9, 2010
PROJECT - Terrain - Hexagon Construction Set Part III

I also did a couple of quick pieces with some "egg" crate packing foam I picked up at work so I thought I'd throw them in today's post as well. Nothing like recycling CD's and CD/DVD spool protectors for some simple war-gaming terrain.
So without further adieu how about some pics huh?


And FINALLY!

Plans are to add some resin "mud" to the hexagon piece as while my base coat for the ground was drying it looked pretty cool as mud. So I've still got to paint the border black, seal it with matte, then add the resin "puddles".
More pics coming once I'm finally complete!
Friday, October 8, 2010
PROJECT: Terrain - Hexagon Construction Set - Part II
So to recap.
- The base for the kit is a piece of laminate flooring I used my jigsaw on to create a nice shape.
- The kit was assembled (it's a snap-to-fit kit) without superglue at first.
- Kit was mounted to the base about halfway through full construction at which point I started to apply superglue (brush out Krazy-Glue ROCKS!) to the joints for stability and strength, then construction was completed.
- Basing material added along with some sculpy rock formations I pulled from another project I scrapped.
- Primed using Krylon Charcoal Gray and when I ran out, brush on mixture of black craft paint and the dark gray GW Foundation Charadon Granite paint...mental note, need to buy more of this now.
- It's ready for paint!


I may go back and add some GW bits (eagles, seals, tabbards or perhaps some orky stuff) to make it more 40kish, but for the most part I'm happy. The little pyramid in the top corner may get a gun turret added just for fun, but I'm not sure on that yet.
More once it's got paint on it!
Anyone else use these kits before? Send me some shots of what you did with it so I can post it up and see what you did different.
-BJC
Saturday, October 2, 2010
REVIEW and PROJECT: Terrain - Hexagon Construction Set


So as usual, I started assembly and totally forgot to shoot any "construction" shots. Typical, must be getting old or something like that. Well below are the shots of the fully assembled kit. Like I said, it's pretty easy to do, and if one took the time to really study the pieces and the connectors you could go crazy in the build-out and be far more creative than I was. Mine built out pretty close to the box cover though I did find that somewhere in the base construction I used some pieces that were needed more towards the top, and seeing as how I had glued those pieces down when I mounted the structure to the base half way through construction I was pretty much stuck with getting creative.
Here's the completed assembly, pre-primer, pre-finished based, pre-paint. In other words, not finished.


Now for scale comparison:

And this was the "small" kit...
Over all this is a great kit and addition to any sci-fi gamers table. Can't wait to get started on the Platformer kit once I finish up a couple client projects. May just have to order the "large" kit and see what I can come up with.
Next step is to finish the base, prime, then slap some paint on it. Will post up the finals when I finish.
-BJC
Tuesday, September 28, 2010
PROJECT - Vanguard Champion Finished
Final shot of my Vanguard Champion. Still not the best pic, but I'm happy with the paint job.


REVIEW - Terrain Pegasus Hobbies Construction Sets
Okay so earlier today I posted up my Terrain article on a few scratch built terrain pieces I made in search of some decent terrain for my kids and I to enhance our 40k time during our Thursday Night Dad vs Kids sessions. So while looking through the Warstore I found these little beauties. The Hexaon and Platformer construction sets are distributed by Pegasus Hobbies, and imported to North and South America by IMEX. Based on what I can find on the box, they are actually produced by a Russian company, though I haven't checked out the website as of yet. Basically these are multi-part modular buildings. The two pictured above are the "small" sets. The Warstore has these and the larger versions in stock. I paid $12.99 each so not bad in the grand scheme of things.
Now I haven't had the chance to mess around with the kits yet. I did break them open and was pleasantly surprised at the level of detail on the sprues. I'm going to work through the next few articles with the Hexagon set first as it allows for the creation of more of a "Station/Fort" kind of structure where as the Platformer kit builds more of what might be a landing platform (or at least that's how I'm going to build it).As always I'll mount the structure on a piece of laminate flooring that I've cut up into various shapes that are perfect for terrain pieces. Not sure how long this is going to take to put together. According to the box, these are snap-fit pieces so technically no gluing should be required which would then allow for the hobbyist to disassemble and reassemble for a change of pace and allow for creating an entirely new piece of terrain. I'm not going that way, I will be gluing the pieces together.
So I broke open the Hexagon box and found the following:
First look - these really are amazingly detailed, the plastic is already a metallic color so if one were to choose not to glue them together then you'd have a nice metallic structure that wouldn't need paint to look good. Obviously, being a painter, I have every intention of painting this structure, and adding my own flavor with some GW bits. I'm thinking Ork bastion, but I'm not sure at this point. Perhaps just an old Imperial way-station that has fallen to ruin. Either way it will be more 40kish?
Instructions are pretty minimal, basically it shows you how the pieces (most everything is halved so you have to assemble the halves to get pieces that then snap together) fit together, but doesn't really give you a layout to build anything. This is good and bad. Good because it allows the hobbyist to get creative and build their own structure, bad as you have no general idea on where to begin.
That's it for now, if you've used these products before and have some links to your finished products let me know and I'll post them here pointing everyone to your site!
-BJC
Project - Terrain
So I thought I'd spend some time talking about terrain today. I'm REALLY not good at making terrain. I've made more than a couple of attempts to make my own game board for the house only to have something go wrong with it and end up trashing a lot of wasted materials. Really nice terrain or a really nice game board are while not essential to our hobby certainly important to the look and feel.
When the kids and I break out our 1" warriors we typically use pots, pans, the water cups we're drinking from during our gaming time as terrain. This was getting pretty boring for us and that led me to look a little closer at getting some decent terrain for our Thursday night Dad vs. Kids sessions. Why? Well for starters, it's difficult to play some scenarios without terrain. When looking for example at some of the Kill Zone scenarios you need to fill your game zone with typically 25-50% terrain. Lets face it, you can only do so much with a couple of pots, a sugar container, and some water cups.
So back to getting creative...
Below are some pieces that I threw together, you see it finally dawned on me that I don't have to have a slick looking game "board" but I needed some decent looking terrain pieces to use on my 4x8 dining room table. Our table is WAY more than big enough for any number of sized games so what was truly missing is just some decent terrain pieces, pieces that are fairly simple to create with all of the totally awesome tutorials out there. Not to mention, there are some great companies making terrain pieces out there that can easily be modified or added to to create some great pieces for your board. So the next few posts will be on terrain.
Here are a couple of pieces I've put together.

First up is a ruined building. It's basically some plasti-card cut into the two walls. Now it's not cut as jaggedly as I would have liked, but it works for what I was looking for. Then I just scattered some cork board around and created the concrete rubble. The blast crater is a resin piece that I can't remember where I ordered from, but it came in a set of 5 so needless to say those will become additions. Everything is mounted on a laminate floor tile I had left over from re-doing my floors so I cut up a piece into the basic shape I wanted and there you go.
 Coloring is pretty straight forward, primed in gray then just worked the colors the way I wanted and for the most part I'm pretty happy with how this piece turned out. Need to figure out adding more texture to the walls themselves, but there plenty of ideas sitting out on the net concerning adding the rough texture to the walls. I may try the mixing sand with watered down PVA glue next time or maybe some textured paint.
The next piece is an objective marker I made. It's based on one of the clear protectors that come at the bottom of a CD/DVD spindle. From there I think I threw on some broken bases, plasti-card, and cork board pieces. PVA glue and sand. The "objective" part of the piece is a shrine made from some Space Marine bits and a cross that came from an old Reaper mini that never got painted. Added in a teleport homer as well lets face it the piece works for any deepstrike scenario as well. Nothing like making a piece multifunctional.


Look for a new article coming up on reviewing some terrain pieces from a Pegasus Hobbies!
-BJC
When the kids and I break out our 1" warriors we typically use pots, pans, the water cups we're drinking from during our gaming time as terrain. This was getting pretty boring for us and that led me to look a little closer at getting some decent terrain for our Thursday night Dad vs. Kids sessions. Why? Well for starters, it's difficult to play some scenarios without terrain. When looking for example at some of the Kill Zone scenarios you need to fill your game zone with typically 25-50% terrain. Lets face it, you can only do so much with a couple of pots, a sugar container, and some water cups.
So back to getting creative...
Below are some pieces that I threw together, you see it finally dawned on me that I don't have to have a slick looking game "board" but I needed some decent looking terrain pieces to use on my 4x8 dining room table. Our table is WAY more than big enough for any number of sized games so what was truly missing is just some decent terrain pieces, pieces that are fairly simple to create with all of the totally awesome tutorials out there. Not to mention, there are some great companies making terrain pieces out there that can easily be modified or added to to create some great pieces for your board. So the next few posts will be on terrain.
Here are a couple of pieces I've put together.

First up is a ruined building. It's basically some plasti-card cut into the two walls. Now it's not cut as jaggedly as I would have liked, but it works for what I was looking for. Then I just scattered some cork board around and created the concrete rubble. The blast crater is a resin piece that I can't remember where I ordered from, but it came in a set of 5 so needless to say those will become additions. Everything is mounted on a laminate floor tile I had left over from re-doing my floors so I cut up a piece into the basic shape I wanted and there you go.
 Coloring is pretty straight forward, primed in gray then just worked the colors the way I wanted and for the most part I'm pretty happy with how this piece turned out. Need to figure out adding more texture to the walls themselves, but there plenty of ideas sitting out on the net concerning adding the rough texture to the walls. I may try the mixing sand with watered down PVA glue next time or maybe some textured paint.
The next piece is an objective marker I made. It's based on one of the clear protectors that come at the bottom of a CD/DVD spindle. From there I think I threw on some broken bases, plasti-card, and cork board pieces. PVA glue and sand. The "objective" part of the piece is a shrine made from some Space Marine bits and a cross that came from an old Reaper mini that never got painted. Added in a teleport homer as well lets face it the piece works for any deepstrike scenario as well. Nothing like making a piece multifunctional.


Look for a new article coming up on reviewing some terrain pieces from a Pegasus Hobbies!
-BJC
Monday, September 27, 2010
Project - Vanguard Champion
Thought I'd throw up a couple of shots of a Vanguard Champion I'm working on for my personal collection.
It's a slightly converted 2008 Games Day Captain mini I won as a prize for the Bartertown Sci-Fi painting competition.
Components:


It's a slightly converted 2008 Games Day Captain mini I won as a prize for the Bartertown Sci-Fi painting competition.
Components:
- 2008 GD mini
- Dragonforge 40mm Hero base from the Lost Empires series.
- Pre-Heresy Jump Pack from Chapterhouse Studios
- Pre-Heresy Masked Helmet from Chapterhouse Studios


As always, thanks for looking. Check back for the finished model in a couple of days. I'll do a full write up on the coloring and the Yellow NMM though without pics on the next post.
-BJC
Tutorial: Dragonforge Studios Hero Base
Okay as promised, here's a mini-tutorial on how I did the resin hero base from Dragonforge Studios.
So I ended up winning the Bartertown Sci-Fi Painting Competition and as compensation for placing first I won some cashola along with being able to choose a prize pack consisting of three items from a group of Bartertown advertisers. One of those pics was a credit with Dragonforge Studios. So I picked up some resin bases from Jeff and of course while shopping on his site ordered myself some additional goodies.
One of those was the Hero Base set from his Lost Empires range. Absolutely love these sculpts, and price wise they beat anything being produced anywhere else. Don't get me wrong, I'm still a major fan of the Micro Art Studio bases, but Jeff has got my attention, favor, AND business with his bases. See Jeff there's some more product pushing for you! I highly recommend his products (more shameless advertising...) ;-)
 So here's a Dragonforge shot of the base I'm working with done in his paint scheme. I'm working with the larger 40mm base on the left for this tutorial. For the most part I really liked the scheme that the studio used so I'm going to replicate it to a point.
I've got the model that is going to sit on this beast of a base as well. I picked up in my prize package the 2008 Games Day Space Marine Captain and the combination of the running pose with that big honkin' thunder hammer just screamed Vanguard conversion. So obviously I must answer the inner call to convert a model. Nice thing about that mini is the arms, and head are separate pieces so I can easily swap out the head for a nice Pre-Heresy Masked head from Chapterhouse Studios...SCORE!!!
Totorial Time!
Prep - Wash the model in cool soapy water and let dry overnight. I use a brush-on priming technique for display quality models so I used Foundation Astronomicon Grey to prime the base, again let dry overnight then hit it again and then let that dry a couple of hours. Ready to go!

Second shot - I know odd that I'm using a Foundation as a secondary color instead of a base coat huh? Well I never said I do things "normal". Dry-brush of Tallarn Flesh - again straight from the bottle 2 layers of dry-brushing.

Third shot - Fairly heavy dry-brush of Bleached Bone (3-layers) again straight from the pot (NOTE - most of my dry-brushing is straight from the pot unless I'm going a "wet" brush technique at which point I think 1:1 with water).

Fourth shot - Light dry-brush with Skull White (1-layer) just over the edges to accentuate the lines.


Fifth shot - Dark Flesh straight from the pot, carefully hit the cracks between the tile and the statue head. I did have to water this down a bit as this series of paint from GW was unusually thick.

Sixth shot - Seem to have lost some pics that or I fogot to shoot the progression stages for the Dark Flesh, however this is where i stared dry-brushing over the Dark Flesh and blended in some of the texture colors over the tiles and statue head. In otherwords, once the Dark Flesh was fully dry from the first coat I took and wet-blended the stages of Bleached Bone and Skull White by taking a detail brush and adding a line of Dark Flesh along the borders of the Dark Flesh and the tile and statue head BEFORE beginning the dry-brushing of the lighter colors. This created a nice effect along the borders.
So I forgot to take any pics of the progression of the final dry-brushing layers. If you see in the "Sixth shot" the Enchanted Blue and the Vallejo Model Color (70857) Golden Olive. The dry-brushing here was more a blotting technique to add some faded marbling to the stone. I also used the Enchanted Blue in the circle on the tile floor. Finally the Eyes were filled in with Black then highlighted to look like Opals and the jewel on the forehead of the face was done in a red jewel technique then a light dry-brushing of Bleached Bone was done over the jewel and eyes to depict dust covering. Black border and a few coats of Matte and VIOLA!

Check back on the site to see what happened when I mounted the Vanguard Conversion!
-BJC
So I ended up winning the Bartertown Sci-Fi Painting Competition and as compensation for placing first I won some cashola along with being able to choose a prize pack consisting of three items from a group of Bartertown advertisers. One of those pics was a credit with Dragonforge Studios. So I picked up some resin bases from Jeff and of course while shopping on his site ordered myself some additional goodies.
One of those was the Hero Base set from his Lost Empires range. Absolutely love these sculpts, and price wise they beat anything being produced anywhere else. Don't get me wrong, I'm still a major fan of the Micro Art Studio bases, but Jeff has got my attention, favor, AND business with his bases. See Jeff there's some more product pushing for you! I highly recommend his products (more shameless advertising...) ;-)
 So here's a Dragonforge shot of the base I'm working with done in his paint scheme. I'm working with the larger 40mm base on the left for this tutorial. For the most part I really liked the scheme that the studio used so I'm going to replicate it to a point.
I've got the model that is going to sit on this beast of a base as well. I picked up in my prize package the 2008 Games Day Space Marine Captain and the combination of the running pose with that big honkin' thunder hammer just screamed Vanguard conversion. So obviously I must answer the inner call to convert a model. Nice thing about that mini is the arms, and head are separate pieces so I can easily swap out the head for a nice Pre-Heresy Masked head from Chapterhouse Studios...SCORE!!!
Totorial Time!
Prep - Wash the model in cool soapy water and let dry overnight. I use a brush-on priming technique for display quality models so I used Foundation Astronomicon Grey to prime the base, again let dry overnight then hit it again and then let that dry a couple of hours. Ready to go!

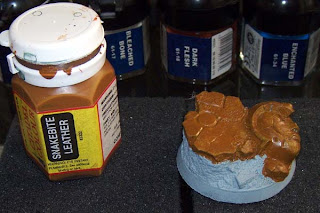
First shot - Snakebite Leather used to base coat the tile surface and the statue face. Make sure you get all the cracks and crevices. I used this straight from the bottle, no thinning down. I did only a single coat on this as I wanted some fading on the base coat for effect.


Third shot - Fairly heavy dry-brush of Bleached Bone (3-layers) again straight from the pot (NOTE - most of my dry-brushing is straight from the pot unless I'm going a "wet" brush technique at which point I think 1:1 with water).

Fourth shot - Light dry-brush with Skull White (1-layer) just over the edges to accentuate the lines.
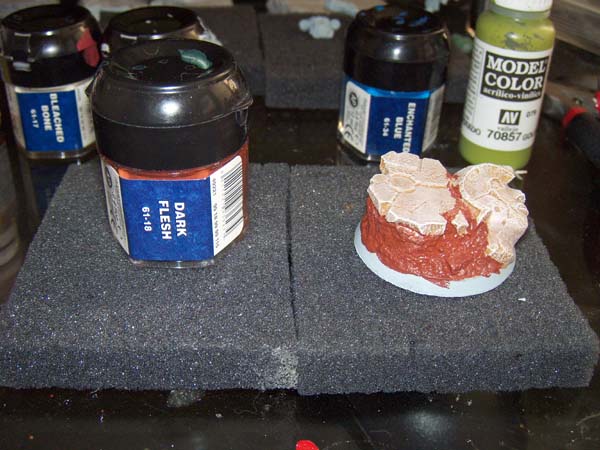

Fifth shot - Dark Flesh straight from the pot, carefully hit the cracks between the tile and the statue head. I did have to water this down a bit as this series of paint from GW was unusually thick.

Sixth shot - Seem to have lost some pics that or I fogot to shoot the progression stages for the Dark Flesh, however this is where i stared dry-brushing over the Dark Flesh and blended in some of the texture colors over the tiles and statue head. In otherwords, once the Dark Flesh was fully dry from the first coat I took and wet-blended the stages of Bleached Bone and Skull White by taking a detail brush and adding a line of Dark Flesh along the borders of the Dark Flesh and the tile and statue head BEFORE beginning the dry-brushing of the lighter colors. This created a nice effect along the borders.
So I forgot to take any pics of the progression of the final dry-brushing layers. If you see in the "Sixth shot" the Enchanted Blue and the Vallejo Model Color (70857) Golden Olive. The dry-brushing here was more a blotting technique to add some faded marbling to the stone. I also used the Enchanted Blue in the circle on the tile floor. Finally the Eyes were filled in with Black then highlighted to look like Opals and the jewel on the forehead of the face was done in a red jewel technique then a light dry-brushing of Bleached Bone was done over the jewel and eyes to depict dust covering. Black border and a few coats of Matte and VIOLA!

Check back on the site to see what happened when I mounted the Vanguard Conversion!
-BJC
Wednesday, September 22, 2010
Site Update
Hey folks,
I know it's been almost 2 weeks since any update. Sorry about that. Work took me away from my hobby for a bit just to come home to a fried hard drive on my main computer. Working on a couple of nice tutorial updates, one of which will hopefully be posted on the Dragonforge Designs website as well. Or at least the pics should be.
So look for it coming soon, hopefully by the end of the week.
-BJC
I know it's been almost 2 weeks since any update. Sorry about that. Work took me away from my hobby for a bit just to come home to a fried hard drive on my main computer. Working on a couple of nice tutorial updates, one of which will hopefully be posted on the Dragonforge Designs website as well. Or at least the pics should be.
So look for it coming soon, hopefully by the end of the week.
-BJC
Subscribe to:
Posts (Atom)